How to use godom
May 11, 2026 • 13 min read
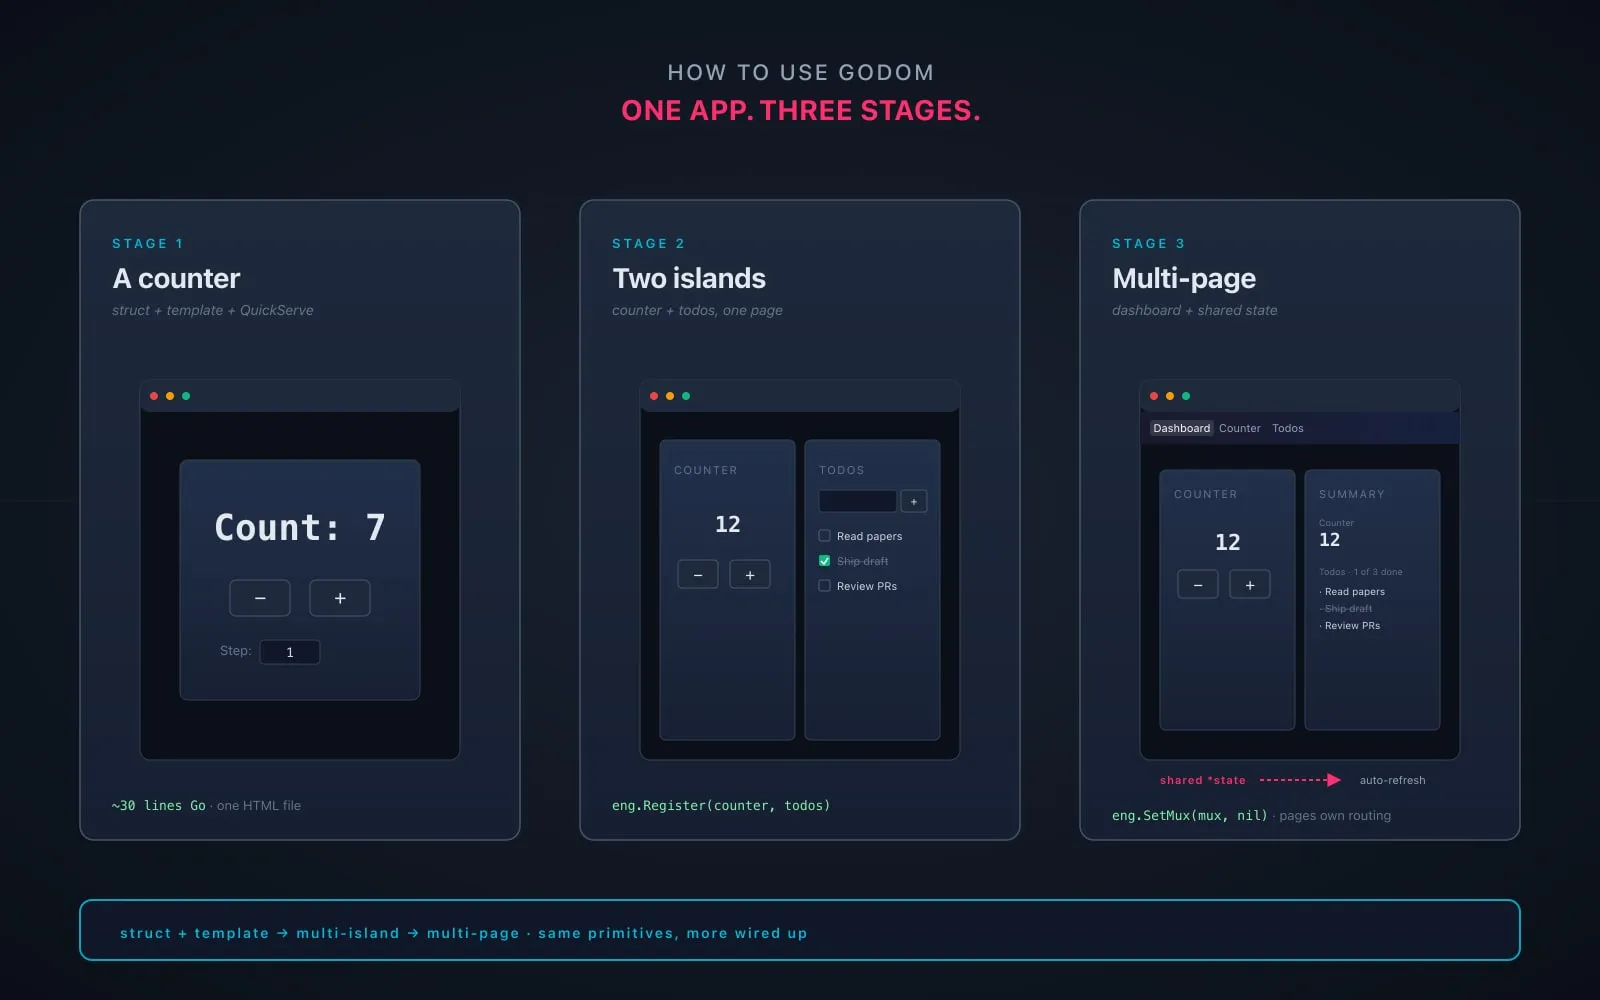
Building a small godom app in three stages: a counter, two islands on one page, then a multi-page layout with a shared-state dashboard.
TL;DR
- A walk-through of building a small godom app: a personal board with a counter and a todo list, then a multi-page layout with a dashboard summary.
- Three stages, each runnable. Stage 1: a single counter island, ~30 lines of Go, one HTML file. Stage 2: counter and todos as separate islands on one page. Stage 3: three pages using Go’s
html/templatefor chrome, with a Summary island embedding the same pointers as Counter and Todos so the dashboard reflects edits made on the other pages. - The point isn’t the app. It’s to see how godom’s basic shape (struct + template + directives) scales to multi-island and multi-page without leaving Go.
The earlier posts in this series have been about godom’s internals ( VDOM , wire protocol , composition , thin bridge ) and the workflow ( writing apps with AI agents , the JS surface ). This one is the practical entry point. If you’ve read the why post and want to see what writing a godom app actually looks like, start here.
I built the example in this post as I wrote it, so every code snippet is from a working app. You can clone the same structure and have it running in under five minutes.
Setup
You need Go 1.25+ and a browser. That’s it.
mkdir personalboard && cd personalboard
go mod init personalboard
go get github.com/anupshinde/godom
The rest of the post is three stages. Each stage is a complete runnable app; you can stop at any of them.
Stage 1: a counter
The minimum godom app is two files: a Go struct and an HTML template.
main.go:
package main

import (
    "embed"
    "log"

    "github.com/anupshinde/godom"
)

//go:embed ui
var ui embed.FS

type App struct {
    godom.Island
    Count int
    Step  int
}

func (a *App) Increment() { a.Count += a.Step }
func (a *App) Decrement() { a.Count -= a.Step }

func main() {
    app := &App{Step: 1}
    app.Template = "ui/index.html"

    eng := godom.NewEngine()
    eng.SetFS(ui)
    log.Fatal(eng.QuickServe(app))
}ui/index.html:
<!DOCTYPE html>
<html>
<head>
    <meta charset="utf-8"/>
    <title>Personal Board - Counter</title>
    <style>
        body:not(.g-ready) { visibility: hidden; }
        body { font-family: system-ui, sans-serif; max-width: 420px; margin: 60px auto; text-align: center; }
        h1 { font-size: 44px; }
        button { padding: 10px 24px; font-size: 20px; }
    </style>
</head>
<body>
    <h1>Count: {{Count}}</h1>
    <div>
        <button g-click="Decrement">−</button>
        <button g-click="Increment">+</button>
    </div>
    <div style="margin-top: 20px;">
        <label>Step:</label>
        <input type="number" min="1" max="100" g-bind="Step"/>
    </div>
</body>
</html>
Run it: go run . The browser opens with the counter at 0. Click + or − and the number changes. Type a new step size into the input; click increment; the number jumps by the new step.
A few things to notice.
The struct is the state. Exported fields (Count, Step) are accessible from the template. Exported methods (Increment, Decrement) are callable from g-click. Unexported fields would be invisible. There’s no separate state container, no reducer, no store; the struct is the model.
Directives connect HTML to state. {{Count}} interpolates the current value into the heading. g-click="Increment" wires the button to the method. g-bind="Step" is two-way: typing into the input updates Step on every keystroke, and any other reference to Step (there isn’t one here, but if there were) would update in lockstep.
The body has body:not(.g-ready) { visibility: hidden; }. This hides the raw template until godom has rendered. The bridge adds g-ready to the body once the initial tree is mounted. Without this CSS, you’d see {{Count}} flash for a fraction of a second before it resolves.
QuickServe is the all-in-one path. It registers the island as the document body, binds a random port, opens a browser tab, and serves. You don’t have to think about routing yet; for a single-island app, this is the right starting point.
If you change a.Count += a.Step to a.Count += a.Step * 2, stop the process (Ctrl+C), run go run . again, refresh the browser. The change is live. There’s no separate JS bundle to rebuild; everything is the one Go binary, and rebuilding it is the whole iteration loop.
A tighter dev loop with Air
godom doesn’t ship a file watcher, but the guide recommends Air for the rebuild-on-save loop. Install once with go install github.com/air-verse/air@latest, drop a small .air.toml in your project root, and run air instead of go run .. Save a .go or .html file, Air rebuilds and restarts the binary; godom’s bridge auto-reconnects, so the browser tab picks up the new build on its own. You don’t have to refresh, you don’t have to restart anything manually. For the rest of this post I’ll keep saying “stop and run again” for clarity, but you could use air in practice and forget about the manual loop.
Stage 2: add a todo list
The next step is two islands on one page: the counter we just built, and a todo list alongside it.
The shape of the change:
- The page chrome (the layout) becomes its own island: a small struct that owns the HTML for the layout but has no state of its own.
- Counter moves into its own template file.
- Todos is a new island with its own struct and template.
- Both child islands are registered with the engine by name.
- The layout’s HTML drops in
<div g-island="counter"></div>and<div g-island="todos"></div>markers; the engine slots each child into its target at render time.
main.go:
package main

import (
    "embed"
    "log"

    "github.com/anupshinde/godom"
)

//go:embed ui
var ui embed.FS

// --- Counter island ---

type Counter struct {
    godom.Island
    Count int
    Step  int
}

func (c *Counter) Increment() { c.Count += c.Step }
func (c *Counter) Decrement() { c.Count -= c.Step }

// --- Todos island ---

type Todo struct {
    Text string
    Done bool
}

type Todos struct {
    godom.Island
    Input string
    Items []Todo
}

func (t *Todos) Add() {
    if t.Input == "" {
        return
    }
    t.Items = append(t.Items, Todo{Text: t.Input})
    t.Input = ""
}

func (t *Todos) Toggle(i int) { t.Items[i].Done = !t.Items[i].Done }
func (t *Todos) Remove(i int) { t.Items = append(t.Items[:i], t.Items[i+1:]...) }

// --- Page layout (root island, just owns the chrome) ---

type Layout struct {
    godom.Island
}

// --- Wire-up ---

func main() {
    counter := &Counter{Step: 1}
    counter.TargetName = "counter"
    counter.Template = "ui/counter.html"

    todos := &Todos{}
    todos.TargetName = "todos"
    todos.Template = "ui/todos.html"

    eng := godom.NewEngine()
    eng.SetFS(ui)
    eng.Register(counter, todos)

    layout := &Layout{}
    layout.Template = "ui/index.html"
    log.Fatal(eng.QuickServe(layout))
}
ui/index.html (the layout):
<!DOCTYPE html>
<html>
<head>
    <meta charset="utf-8"/>
    <title>Personal Board</title>
    <style>
        body:not(.g-ready) { visibility: hidden; }
        body { font-family: system-ui, sans-serif; max-width: 720px; margin: 40px auto; padding: 0 20px; }
        .grid { display: grid; grid-template-columns: 1fr 1fr; gap: 24px; }
        .card { background: #fff; border: 1px solid #e5e5e5; border-radius: 8px; padding: 20px; }
    </style>
</head>
<body>
    <h1>Personal Board</h1>
    <div class="grid">
        <div class="card"><div g-island="counter"></div></div>
        <div class="card"><div g-island="todos"></div></div>
    </div>
</body>
</html>ui/counter.html:
<div>
    <div style="font-size: 32px; font-weight: 600;">Count: {{Count}}</div>
    <div>
        <button g-click="Decrement">−</button>
        <button g-click="Increment">+</button>
    </div>
    <div style="font-size: 13px;">
        <label>Step:</label>
        <input type="number" min="1" max="100" g-bind="Step"/>
    </div>
</div>ui/todos.html:
<div>
    <div style="font-size: 18px; font-weight: 600;">Todos</div>
    <div>
        <input type="text" g-bind="Input" g-keydown="Enter:Add" placeholder="Add an item..."/>
        <button g-click="Add">Add</button>
    </div>
    <ul style="list-style: none; padding: 0;">
        <li g-for="todo, i in Items" style="display: flex; gap: 8px; padding: 6px 0;">
            <input type="checkbox" g-checked="todo.Done" g-click="Toggle(i)"/>
            <span style="flex: 1;" g-class:done="todo.Done">{{todo.Text}}</span>
            <button g-click="Remove(i)">×</button>
        </li>
    </ul>
    <style>.done { text-decoration: line-through; color: #999; }</style>
</div>
Run it: go run . Two cards side by side. The counter behaves like before. Typing into the todos input and pressing Enter adds an item; checking the box toggles it done; the × removes it.
A few new things to point out.
Each island is a separate Go struct with its own template. The counter and the todos don’t know about each other. They share a process but not state. Each one owns its render cycle, its event queue, its goroutine, and its slice of the DOM.
The layout is a real island too, just an empty one. Layout struct { godom.Island } has no state and no methods. Its template is the page chrome. QuickServe(layout) makes it the root of the document. The <div g-island="counter"> and <div g-island="todos"> elements in the layout’s HTML are where the children mount.
g-for="todo, i in Items" loops over the slice, exposing todo as the item and i as the index. Inside the loop, todo.Text and todo.Done resolve against the item. The Toggle(i) and Remove(i) calls take the index back to the Go side as an int argument.
g-keydown="Enter:Submit" syntax. A keymap directive that fires the named method only when the matching key is pressed. You can chain them: g-keydown="Enter:Add;Escape:Cancel". The expression grammar treats Enter, Escape, ArrowUp, etc. as key names.
g-class:done="todo.Done" toggles the done class on the element when the expression is truthy. The CSS strikes the text through. No JS needed for the style logic; the directive is the wiring.
If you open the same URL in two browser tabs, both stay in sync. Type a todo in one tab; it appears in the other. That’s not a feature you turned on; it’s a property of the architecture. The Go process is the source of truth, and every connected browser receives the same patches.
Stage 3: multi-page
The single-page version is fine for a tool you only ever look at one way. Once you want different views (a focused page for the counter, a focused page for the todos, a dashboard that shows both summarized), you need real pages.
godom doesn’t ship a router. It doesn’t need to; Go’s standard library already has one. You build the page chrome with html/template, define routes with net/http, and tell godom about your mux. Each page hosts whichever islands it wants by including <div g-island="name"> targets.
The interesting trick: the dashboard page wants to summarize the counter and the todos rather than render them in full. We’ll do that with a third island, Summary, that embeds the same pointers as Counter and Todos. When Counter mutates the count or Todos changes its list, godom’s shared-pointer refresh re-renders Summary too. Same data, two views.
The structure:
personalboard/
├── main.go
├── pages/
│   ├── layout/base.html       (shared chrome with nav)
│   ├── dashboard/page.html
│   ├── counter/page.html
│   └── todos/page.html
└── islands/
    ├── counter.html
    ├── todos.html
└── summary.htmlmain.go:
package main

import (
    "embed"
    "html/template"
    "log"
    "net/http"

    "github.com/anupshinde/godom"
)

//go:embed pages
var pagesFS embed.FS

//go:embed islands
var islandsFS embed.FS

// --- Shared state ---

type CounterState struct {
    Count int
    Step  int
}

type Todo struct {
    Text string
    Done bool
}

type TodoState struct {
    Items []Todo
}

// --- Counter island ---

type Counter struct {
    godom.Island
    *CounterState
}

func (c *Counter) Increment() { c.Count += c.Step }
func (c *Counter) Decrement() { c.Count -= c.Step }

// --- Todos island ---

type Todos struct {
    godom.Island
    *TodoState
    Input string
}

func (t *Todos) Add() {
    if t.Input == "" {
        return
    }
    t.Items = append(t.Items, Todo{Text: t.Input})
    t.Input = ""
}

func (t *Todos) Toggle(i int) { t.Items[i].Done = !t.Items[i].Done }
func (t *Todos) Remove(i int) { t.Items = append(t.Items[:i], t.Items[i+1:]...) }

// --- Summary island (read-only, observes both shared states) ---

type Summary struct {
    godom.Island
    *CounterState
    *TodoState
}

func (s *Summary) TotalCount() int { return len(s.Items) }

func (s *Summary) DoneCount() int {
    n := 0
    for _, t := range s.Items {
        if t.Done {
            n++
        }
    }
    return n
}

// --- Page rendering ---

type PageData struct {
    Title string
    Page  string
}

func mustTmpl(page string) *template.Template {
    return template.Must(template.ParseFS(pagesFS,
        "pages/layout/base.html",
        "pages/"+page+"/page.html",
    ))
}

// --- Wire-up ---

func main() {
    counterState := &CounterState{Step: 1}
    todoState := &TodoState{}

    counter := &Counter{CounterState: counterState}
    counter.TargetName = "counter"
    counter.Template = "islands/counter.html"

    todos := &Todos{TodoState: todoState}
    todos.TargetName = "todos"
    todos.Template = "islands/todos.html"

    summary := &Summary{CounterState: counterState, TodoState: todoState}
    summary.TargetName = "summary"
    summary.Template = "islands/summary.html"

    eng := godom.NewEngine()
    eng.SetFS(islandsFS)
    eng.Register(counter, todos, summary)

    pages := map[string]*template.Template{
        "dashboard": mustTmpl("dashboard"),
        "counter":   mustTmpl("counter"),
        "todos":     mustTmpl("todos"),
    }

    mux := http.NewServeMux()
    serve := func(path, pageKey, title string) {
        mux.HandleFunc(path, func(w http.ResponseWriter, r *http.Request) {
            if r.URL.Path != path {
                http.NotFound(w, r)
                return
            }
            w.Header().Set("Content-Type", "text/html; charset=utf-8")
            _ = pages[pageKey].ExecuteTemplate(w, "base", &PageData{Title: title, Page: pageKey})
        })
    }
    serve("/", "dashboard", "Dashboard")
    serve("/counter", "counter", "Counter")
    serve("/todos", "todos", "Todos")

    eng.SetMux(mux, nil)
    if err := eng.Run(); err != nil {
        log.Fatal(err)
    }
    log.Fatal(eng.ListenAndServe())
}
The shared-state pattern is the load-bearing piece. Counter embeds *CounterState, and so does Summary. They’re literally pointing at the same heap object. When counter.Increment() mutates Count, godom’s startup-time index notices that another registered island (Summary) embeds the same pointer, and re-renders that island too. No event bus, no callback registration. Two islands, one source of truth.
The same trick works for *TodoState. Edit a todo on /todos; the Summary on / re-renders the moment you navigate back (or, if you have both tabs open, immediately).
pages/layout/base.html (the chrome shared across all pages):
{`{{define "base"}}`}<!DOCTYPE html>
<html>
<head>
    <meta charset="utf-8"/>
    <title>{`{{.Title}}`} - Personal Board</title>
    <style>
        body {`{ font-family: system-ui, sans-serif; margin: 0; background: #fafafa; }`}
        [g-island]:not(.g-ready) {`{ visibility: hidden; }`}
        nav {`{ background: #1a1a2e; color: #eee; padding: 12px 24px; display: flex; gap: 8px; }`}
        nav a {`{ color: #ccc; text-decoration: none; padding: 6px 12px; border-radius: 4px; }`}
        nav a.active {`{ background: rgba(255,255,255,0.12); color: #fff; }`}
        main {`{ max-width: 760px; margin: 32px auto; padding: 0 24px; }`}
        .card {`{ background: #fff; border: 1px solid #e5e5e5; border-radius: 8px; padding: 20px; }`}
        .grid-2 {`{ display: grid; grid-template-columns: 1fr 1fr; gap: 20px; }`}
    </style>
</head>
<body>
    <nav>
        <a href="/"        class="{`{{if eq .Page "dashboard"}}active{{end}}`}">Dashboard</a>
        <a href="/counter" class="{`{{if eq .Page "counter"}}active{{end}}`}">Counter</a>
        <a href="/todos"   class="{`{{if eq .Page "todos"}}active{{end}}`}">Todos</a>
    </nav>
    <main>
        <h1>{`{{.Title}}`}</h1>
        {`{{template "body" .}}`}
    </main>
    <script src="/godom.js"></script>
</body>
</html>{`{{end}}`}
Note the two template languages here. The double-brace expressions and if/end blocks in the layout are Go’s html/template syntax, evaluated once on the server when the page is served. The g-island and g-text and other g-* attributes are godom’s directives, evaluated by godom’s render path once the bridge connects. They don’t conflict; they’re operating on different layers.
The <script src="/godom.js"></script> is godom’s bridge. The engine registers it on the mux for you when you call SetMux.
One small change from the earlier stages: the flash-prevention rule is now [g-island]:not(.g-ready) instead of body:not(.g-ready). In single-island mode (QuickServe), the document body itself is the root island and gets .g-ready once mounted. In multi-page mode the body is rendered by Go’s template, not by godom, so .g-ready lands on each individual island target instead. Hiding [g-island] until ready gets you the same no-flash behavior without leaving the body invisible forever.
pages/dashboard/page.html:
{`{{define "body"}}`}
<div class="grid-2">
    <div class="card">
        <div g-island="counter"></div>
    </div>
    <div class="card">
        <div g-island="summary"></div>
    </div>
</div>
{`{{end}}`}pages/counter/page.html:
{`{{define "body"}}`}
<div class="card" style="max-width: 360px;">
    <div g-island="counter"></div>
</div>
{`{{end}}`}pages/todos/page.html:
{`{{define "body"}}`}
<div class="card">
    <div g-island="todos"></div>
</div>
{`{{end}}`}
The island templates are the same as stage 2, plus one new one:
islands/summary.html:
<div>
    <div style="font-size: 18px; font-weight: 600;">Summary</div>

    <div style="margin: 12px 0;">
        <div style="color: #666; font-size: 13px;">Counter</div>
        <div style="font-size: 22px; font-weight: 600;">{{Count}}</div>
    </div>

    <div>
        <div style="color: #666; font-size: 13px;">Todos · {{DoneCount()}} of {{TotalCount()}} done</div>
        <ul style="list-style: none; padding: 0;">
            <li g-for="todo, i in Items" g-if="i < 5" style="padding: 4px 0;">
                <span g-class:done="todo.Done">{{todo.Text}}</span>
            </li>
        </ul>
        <div g-if="TotalCount() == 0" style="color: #666;">No todos yet. Add some on the Todos page.</div>
    </div>
</div>
A few new pieces here.
Method calls in interpolation. {{DoneCount()}} and {{TotalCount()}} resolve to the method’s return value. godom’s expression grammar supports zero-arg method calls in g-text, g-html, g-show, g-if, and {{}} interpolation. They don’t work inside g-for (which is field-only), but inside other directives they’re a clean way to expose derived values without needing to materialize them as fields.
g-for with g-if to filter. Showing only the first 5 todos is done with g-for="todo, i in Items" g-if="i < 5". The loop variable i is in scope inside the row; g-if removes any row where the expression is falsy. The result is “top 5” without a method or a precomputed slice.
g-if="TotalCount() == 0". Method calls show up in conditionals too. The empty-state message renders only when the todo count is zero.
Run it: go run . You’ll see the dashboard with the counter and the summary side by side. Click + a few times. Navigate to /todos. Add some items. Go back to /. The summary shows the count, the first five items, and the done/total ratio. Now open / in two tabs and edit on one; the other updates without a reload.
What you have
After stage 3 you have:
- Three pages with shared chrome rendered by
html/template. - Three islands. Two of them (Counter, Todos) are interactive; one (Summary) is read-only.
- Shared state via embedded pointers, with cross-island refresh that happens automatically when the source pointer is mutated.
- Multi-tab sync, because the Go process is the source of truth and every connected browser receives patches off the same render path.
- Zero JavaScript that you wrote.
The whole thing is one Go binary. go build gives you a single file you can run, distribute, or drop on another machine.
What to do next
Three honest suggestions for what to add.
A persistence layer. Right now the state is in-memory; restart the server, everything is gone. Add a small Save() method on Todos that writes a JSON file, and load it in main() before registering. The dashboard already reflects it through the shared pointer.
A new island. Pick something small you’d actually use. A clock, a markdown scratchpad, a stopwatch. Make it a fourth island, add a route, link it from the nav. The pattern is the same as Summary: a struct embedding godom.Island, a template, a TargetName, register, route. Goroutine-driven updates work too; call island.Refresh() from a time.Ticker if you want the clock.
A real source of truth. Replace the in-memory slice with a SQLite table or a JSON file. The Todos struct becomes a thin layer over a query. The architecture doesn’t change.
If you want to look at more involved examples, the godom repo has a examples/ directory with several dozen, ranging from this same shape (counter, todolist, multi-island) up to a 3D solar system and a browser-based terminal running Claude Code. The patterns scale; the basic structure stays the same.
The reference doc for AI agents (covered in the AI-agents post ) is a useful companion if you’d rather have an agent build features for you. Point it at this app and the reference, and “add a clock island” is a one-shot prompt.
That’s it. Three stages, one small app, every piece grounded in actual running code. The framework’s surface is smaller than this tutorial implies, but the tutorial is for the moment you sit down and actually write your first one.